Spherometers

A spherometer is a device that does just as the name suggests: it measures (ometer) a sphere (sphere). But what exactly would you measure on a sphere? You could measure its diameter or the circumference of a great circle, the surface area or the radius. But all of these measurements will change proportionally to the radius R of the sphere. Any surface that is curved has a radius of curvature, the radius of the sphere that approximates the surface locally. Thus a spherometer can measure the radius of curvature of an item such as a lens and curved mirrors that are spherical in shape.

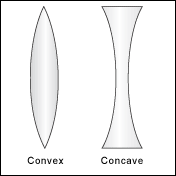
Convex and concave lenses

Image of a convex and concave lens

The first known spherometer was invented by French optician Robert-Aglaé Cauchoix in 1810. They were manufactured starting in the nineteenth century primarily for the use of opticians in grinding lenses and astronomers in grinding lenses and curved mirrors. Though there are several shapes of lenses, most lenses are spherical in that the curve of the lens is a portion of a sphere. See the examples of a bi-convex and a bi-concave lens to the right.

Engineers also used spherometers to measure curvature as well the thickness of objects such as metal plates. Machinists use them to measure the depth of depressions or raised areas on surfaces. This allows for weak points in items such as oil well piping to be discovered before being shipped to a well site. They were also used in the physics classroom to conduct experiments. One such common experiment would be to produce Newton’s ring. By refracting light through a curved and a flat medium (a lens and the flat), an interference pattern of concentric dark and light rings appears.
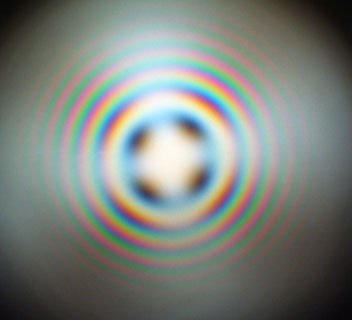
 

An image of Newton's ring, interference pattern of concentric light and dark ringsNewton's Ring


Though amateur astronomers still sometimes grind their own lenses, most lens and mirror production is now largely automated. Spherometers are still made, many look much like to older ones or have analog gages instead of scales. Several companies produce electronic versions that yet still rely on the same underlying theory.

Most spherometers were small devices, usually ranging from four or five centimeters to less than twenty centimeters across and were predominantly used by lens makers to precisely measure the curvature of a lens. Given the delicate nature of these devices, they are easily bent, so they often come with a glass plate, called a flat, that can be used to zero the micrometer. Spherometers have three legs that form an equilateral triangle. Recall from geometry that three points determine a plane, so the three legs will always touch the glass. But you also know from experience that four points do not, think of a wobbly café table. A fourth leg or point is located at the center the three legs. This central point is attached to a micrometer screw that can be raised or lowered. Micrometers are devices such as calipers that translate very small measurements into larger movements of the device to allow precise measurements. One complete turn of the central screw of the spherometer raises or lowers the center point a set distance which is determined by the size of the thread of the screw and the radius of the disc. Each rotation of the screw raises the disc one unit on the vertical scale. To make measurements to two decimal places, the horizontal disc of the spherometer is often marked to give readings to hundredths of a rotation. The distance the central point is above or below the plane made by the three legs is then multiplied by the length associated with one turn of the micrometer. In this way a spherometer can measure both a positively or negatively curved surface to high accuracy.

The mathematics behind the device uses only high school trigonometry and the mathematics of right triangles. If the distance between any two of the three legs is denoted by a, then the distance from any of the three legs to the central point is .

The micrometer measures the distance above or below the plane of the three legs. In optics, the distance h is called the sagitta, referred to using the letter h or s, for the depth of glass removed from a lens. Using h, the standard equation for the curvature of a sphere is  .


See the figure below for a view of the lens and spherometer from the side (with only two of the three legs shown).
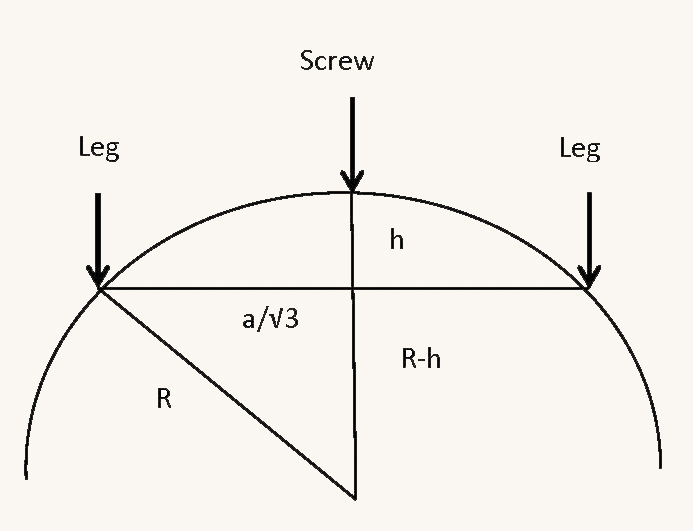
view of the lens and spherometer from the side

References

Stargazerslounge.com


Mills, A. “The Spherometer”, eRittnehouse, Vol 24, 2012/2013


Warner, D.J., “Spherometer”, Instruments of Science: An Historical Encyclopedia, 1998, pp.569-570

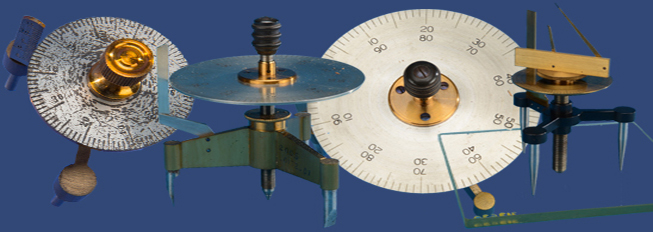
A spherometer is used primarily for measuring the curvature of objects such as lenses and curved mirrors. For further information about spherometers. This example is marked with the "Cenco" trademark of the Central Scientific Company of Chicago, founded in 1900.
Description
A spherometer is used primarily for measuring the curvature of objects such as lenses and curved mirrors. For further information about spherometers. This example is marked with the "Cenco" trademark of the Central Scientific Company of Chicago, founded in 1900. They manufactured and sold educational scientific apparatus. Their 1936 catalog describes this item as "Spherometer, Student Form" and lists experiments in several popular physics textbooks that can be performed with this instrument. This instrument includes a demonstration optical flat and a large double-convex lens. This particular setup was probably used by students to replicate the Newton's Rings experiment. This spherometer is small (3.5 inches in height) and has both a vertical scale and a horizontal scale on the disc. This spherometer sold for $4.50 in 1941. This spherometer was originally owned by Columbia University.
Central Scientific Company, Catalog (1941): 1014.
Location
Currently not on view
date made
ca 1906-1950
maker
Central Scientific Company
ID Number
2001.0162.04
catalog number
2001.0162.04
accession number
2001.0162
A spherometer is used primarily to measure the curvature of objects such as lenses and curved mirrors. This example came from the U.S. Naval Observatory. It was made by Alvan Clark & Sons for the U.S. expeditions to observe the 1874 transit of Venus.
Description
A spherometer is used primarily to measure the curvature of objects such as lenses and curved mirrors. This example came from the U.S. Naval Observatory. It was made by Alvan Clark & Sons for the U.S. expeditions to observe the 1874 transit of Venus. It has only a horizontal scale and no vertical scale common to most spherometers. The box for this sphereometer appears to be homemade.
Alvan Clark (1804-1887) was the first prominent American telescope maker. In 1846 he went into business with his two sons, Alvan G. and George B. Clark, founding Clark & Sons. At first they repaired scientific instruments, but the firm quickly progressed on to making telescopes. During the second half of the 19th century, five of Clarks' telescopes held the record for world's largest. To aid in grinding lenses, Clark & Sons also made devices such as spherometers.
Ref: Warner, D. J., "Alvan Clark & Sons: Artists in Optics," United States National Museum Bulletin 274 (1968): 1-13.
Location
Currently not on view
date made
ca 1800s
maker
Alvan Clark & Sons
ID Number
2005.0172.07
accession number
2005.0172
catalog number
2005.0172.07
A spherometer is a device used primarily for measuring the curvature of objects such as lenses and curved mirrors. They were produced from the 18th to the early 20th centuries, for use by astronomers and opticians and are still mentioned on websites today.
Description
A spherometer is a device used primarily for measuring the curvature of objects such as lenses and curved mirrors. They were produced from the 18th to the early 20th centuries, for use by astronomers and opticians and are still mentioned on websites today. The spherometer is a micrometer comprised of three legs that define a plane. A central point can be raised or lowered to just touch the surface. The distance this central point is above or below the flat plane made by the three legs is read off the vertical scale on the device. This distance is then translated into a number that describes the radius of curvature of the surface. Spherometers can also be used to measure the thickness of a flat plate or the amount a flat surface deviates from being truly flat. (See the introduction to the spherometers for the details of the uses and mathematics of this device.)
This spherometer was produced in the mid-19th century by William Grunow, a German immigrant and instrument maker living in West Point, New York. William and his brother Julius immigrated to New York in 1849. They began making microscopes while William produced other instruments, such as the spherometer under the marking “Wm. Grunlow, New York.” This spherometer was owned by the Department of Physics and Chemistry at the United States Military Academy, West Point, New York and transferred to the Smithsonian in 1958.
References:
Mills, A. “The Spherometer,” eRittenhouse 24, no. 1 (2012/2013).
Warner, D.J., “Spherometer,” Instruments of Science: An Historical Encyclopedia (1998): 569-570.
Location
Currently not on view
date made
after 1849
maker
Grunow, William
ID Number
MA.315739
accession number
217544
catalog number
315739
A spherometer is a device used primarily for measuring the curvature of objects such as lenses and curved mirrors. For further information about spherometers, see object MA.315739.This spherometer was constructed by Allen L.
Description
A spherometer is a device used primarily for measuring the curvature of objects such as lenses and curved mirrors. For further information about spherometers, see object MA.315739.
This spherometer was constructed by Allen L. Colton (1857-1950) while he was a student at the University of Michigan. He worked for the US Weather Bureau in the late 1800s, followed by five years as assistant astronomer at the Lick Observatory where he was a physicist, photographer, and instrument maker. Early in the 20th century, he joined the faculty at the University of Wisconsin as a physics instructor. This item was donated to the Smithsonian in Colton's memory by his cousin.
To improve accuracy, a magnifying lever is mounted on the top of the micrometer disc. The two small arms would have pointed to a secondary scale that arched over the top of the device, but is now missing.
Barton, Albert (ed.), The Wisconsin Alumni Magazine 5, no. 3 (December 1903): 82. http://www.digicoll.library.wisc.edu
Location
Currently not on view
date made
ca 1877
maker
Colton, Allen L.
ID Number
MA.313630
accession number
189444
catalog number
313630
A spherometer is used primarily for measuring the curvature of objects such as lenses and curved mirrors. The inscription on this example reads “W. & L.E. GURLEY, TROY, N.Y.”Ref: W. & L.E. Gurley, Catalog (Troy, N.Y., 1910), pp. 94-96.Currently not on view
Description
A spherometer is used primarily for measuring the curvature of objects such as lenses and curved mirrors. The inscription on this example reads “W. & L.E. GURLEY, TROY, N.Y.”
Ref: W. & L.E. Gurley, Catalog (Troy, N.Y., 1910), pp. 94-96.
Location
Currently not on view
date made
ca 1910
maker
W. & L. E. Gurley
ID Number
PH.335217
catalog number
335217
accession number
315390

Our collection database is a work in progress. We may update this record based on further research and review. Learn more about our approach to sharing our collection online.

If you would like to know how you can use content on this page, see the Smithsonian's Terms of Use. If you need to request an image for publication or other use, please visit Rights and Reproductions.